BeamNG.drive can make finding a good force feedback balance challenging without the correct tools. However, with this tutorial, you can eliminate clipping and give yourself the best experience possible on whichever wheelbase you own within BeamNG.

Your feedback will clip much more when you're off-road, so make sure to test various cars and terrains.
In the search bar, type in 'FFB' for Force Feedback. The app will appear with a green and orange line. Drag it to where it best fits in your UI setup. You can see it clearly without it overlapping or hiding behind any other apps on the screen.

The central app displays Force Feedback whilst going over a suspension test course.
The most important thing when using this force feedback app is to ensure that the orange spikes do not reach or break the height limit of the dark square background. If the spikes reach the app's vertical borders, this is called 'Clipping'.

An example of force feedback clipping
Clipping is when your steering wheel attempts to deliver more data than it can output, therefore losing detail in the transfer from the software to the wheel and often giving heavy vibrations and vague feedback. This is why the UI app is vital to have and utilise so that this clipping does not happen and ruin your BeamNG driving experience.
Without being too hypocritical, clipping is not entirely avoidable within BeamNG. Unlike most other simulators, BeamNG is built around impacts and crashes. In significant accidents, do not be surprised if your feedback peaks slightly. What is important is that your feedback does not usually peak when driving and racing.

Make sure to let go of your steering wheel in the case of a crash, especially if you are using a direct drive wheelbase
Testing your feedback off-road is a great way to dial in your force feedback, but make sure you also test it on circuits and roads around BeamNG's many maps. If circuit racing is your main activity, Hirochi Raceway is a great place to start for smooth tarmac and rumble strip kerbs. In contrast, the variety of roads around Jungle Rock Island is fantastic for testing how your wheel reacts to the varying quality of paved roads.
We recommend binding temporary FFB strength and smoothing buttons to adjust these settings. Simply type 'FFB' into the vehicle controls search bar in the settings menu and assign buttons to increase and decrease FFb strength and FFB smoothing, respectively.

Average force feedback graph curve for an SUV on a medium-quality paved road.
Once these buttons have been assigned, you can drive around and adjust your force feedback as you go, meaning you don't have to keep stopping and adjusting the menus every time you want to try a new combination of force feedback. Once you have the settings that work for your wheelbase, go through to the main force feedback menu and input the strength and smoothing figures you have settled on.
There are so many factors in determining your force feedback settings for BeamNG, but experimentation and trying new things and sliders are the best ways to go. Try not to take it too seriously, and have fun doing it. You get the most out of these sandbox-style games when you are having fun and are relaxed, especially over this festive period.
What settings do you use and adjust to perfect your experience within BeamNG? Let us know in the comments below!
Your feedback will clip much more when you're off-road, so make sure to test various cars and terrains.
Utilise your UI apps
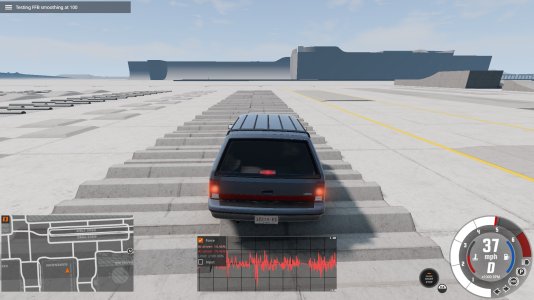
With BeamNG being an open-world sandbox, having a fully customisable UI is vitally essential for the wide variety of driving and racing disciplines players can have fun with. However, it is not just helpful driving apps that you need to be able to take advantage of.In the search bar, type in 'FFB' for Force Feedback. The app will appear with a green and orange line. Drag it to where it best fits in your UI setup. You can see it clearly without it overlapping or hiding behind any other apps on the screen.
The central app displays Force Feedback whilst going over a suspension test course.
Dialling in your Force Feedback
Once the app is visible within your UI, start driving any vehicle around your chosen map. We recommend Gridmap 2.0 and it's variety of suspension test paths. These short stretches of bumpy terrain are perfect for ensuring you get the widest range of results whilst testing out your force feedback settings.The most important thing when using this force feedback app is to ensure that the orange spikes do not reach or break the height limit of the dark square background. If the spikes reach the app's vertical borders, this is called 'Clipping'.
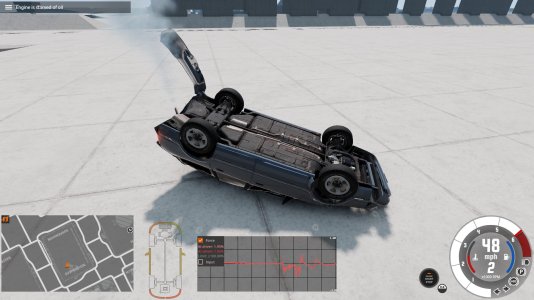
An example of force feedback clipping
Clipping is when your steering wheel attempts to deliver more data than it can output, therefore losing detail in the transfer from the software to the wheel and often giving heavy vibrations and vague feedback. This is why the UI app is vital to have and utilise so that this clipping does not happen and ruin your BeamNG driving experience.
Without being too hypocritical, clipping is not entirely avoidable within BeamNG. Unlike most other simulators, BeamNG is built around impacts and crashes. In significant accidents, do not be surprised if your feedback peaks slightly. What is important is that your feedback does not usually peak when driving and racing.
Make sure to let go of your steering wheel in the case of a crash, especially if you are using a direct drive wheelbase
Testing your feedback off-road is a great way to dial in your force feedback, but make sure you also test it on circuits and roads around BeamNG's many maps. If circuit racing is your main activity, Hirochi Raceway is a great place to start for smooth tarmac and rumble strip kerbs. In contrast, the variety of roads around Jungle Rock Island is fantastic for testing how your wheel reacts to the varying quality of paved roads.
We recommend binding temporary FFB strength and smoothing buttons to adjust these settings. Simply type 'FFB' into the vehicle controls search bar in the settings menu and assign buttons to increase and decrease FFb strength and FFB smoothing, respectively.
Average force feedback graph curve for an SUV on a medium-quality paved road.
Once these buttons have been assigned, you can drive around and adjust your force feedback as you go, meaning you don't have to keep stopping and adjusting the menus every time you want to try a new combination of force feedback. Once you have the settings that work for your wheelbase, go through to the main force feedback menu and input the strength and smoothing figures you have settled on.
There are so many factors in determining your force feedback settings for BeamNG, but experimentation and trying new things and sliders are the best ways to go. Try not to take it too seriously, and have fun doing it. You get the most out of these sandbox-style games when you are having fun and are relaxed, especially over this festive period.
What settings do you use and adjust to perfect your experience within BeamNG? Let us know in the comments below!